CERNphone: creation and installation guide

Introduction
In order to use CERNphone, you need to follow the steps described below:
- Obtain a CERNphone number from CERNPhone Resources Portal
- Install and configure the CERNphone desktop app and/or
- Install and configure the CERNphone mobile app on your smartphone (CERN or private smartphone)
Note that the CERNphone mobile and desktop apps can be installed and used independently. If both are installed/configured, calls to your number will ring simultaneously on mobile and desktop. If your service has a justified need for physical IP phones (for control centres, receptions, secretariats etc), please contact us beforehand (you will need to provide a justification countersigned by your supervisor).
1. Obtaining a new phone number
Please get acquainted first with the types of users and numbers by reading this document.
Please visit the CERNPhone Resources Portal and follow the instructions below for creating a personal phone number or a shared phone number. Each user can get at most one personal phone number.
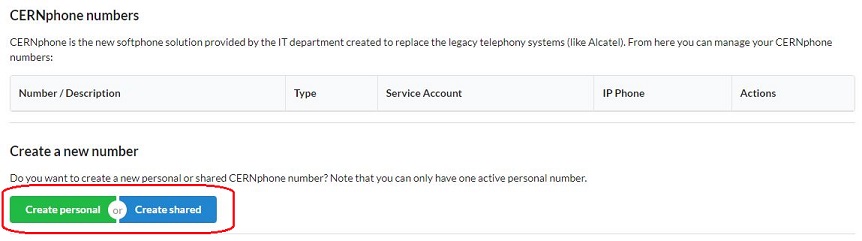
Note that shared phone numbers are exclusively for service purposes and are not aimed to serve as a second personal number - see details here. Before requesting a shared phone number, we strongly recommend that you login into the resources portal using a CERN service account, so that the number is associated with that account instead of your own. If neeeded, the Telecom Service can also associate a service account to a shared number.
Warning
The creation process may take a while to complete (up to 1 hour) and for your number to become visible on the CERNphone portal described below.
List your assigned phone numbers
Go to the web page https://cernphone-resources.web.cern.ch.
On this page you will see all phone numbers which are activated on this service and of which you are the owner.
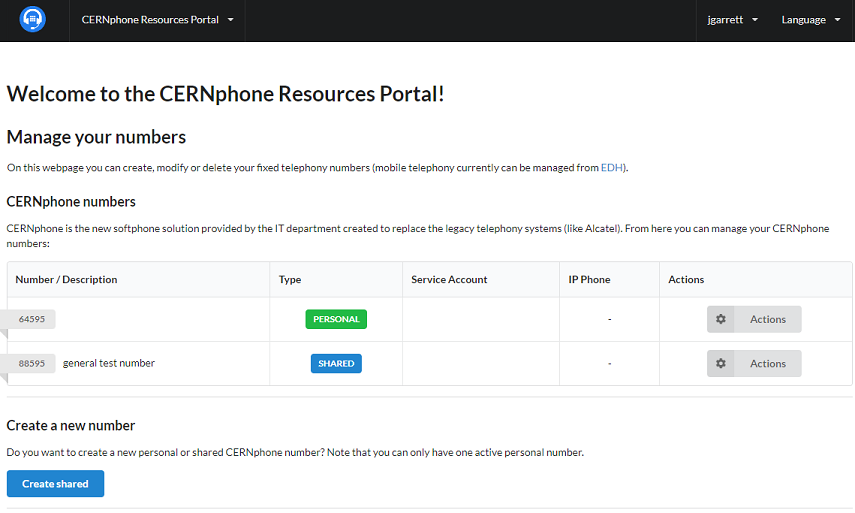
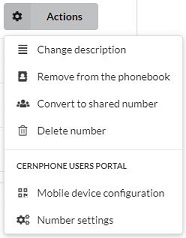
Click on Actionsto see all available operations:
Suppress a phone number
Your assigned phone numbers will remain active as long as you have an active affiliation with CERN. When you leave CERN your personal phone number will be suppressed automatically (more details). The shared phone numbers you own will be re-assigned to your supervisor.
You can manually suppress your phone numbers by going to https://cernphone-resources.web.cern.ch and clicking on ![]() .
.
Updating the CERN phonebook
When a new personal phone number is created, the phone book is automatically updated if the user checks the Update Phonebook box. When a personal phone number is suppressed, it is automatically suppressed from the phonebook.
The phonebook information can be manually updated by the secretariats through the PIE/PAD application.
A shared phone number can be added to the phonebook by using this ServiceNow request form.
2. Installing CERNphone desktop
The installation procedure differs depending on the platform (Windows, Linux, Mac), see below. Updates are handled by the application itself.
Windows
If you're running a CERN computer with CMF, please install CERNphone via CMF.
For the devices without CMF access, please download the installer (link) and execute it to install the application. It will be installed as a regular application and it will be available in the Windows menu.
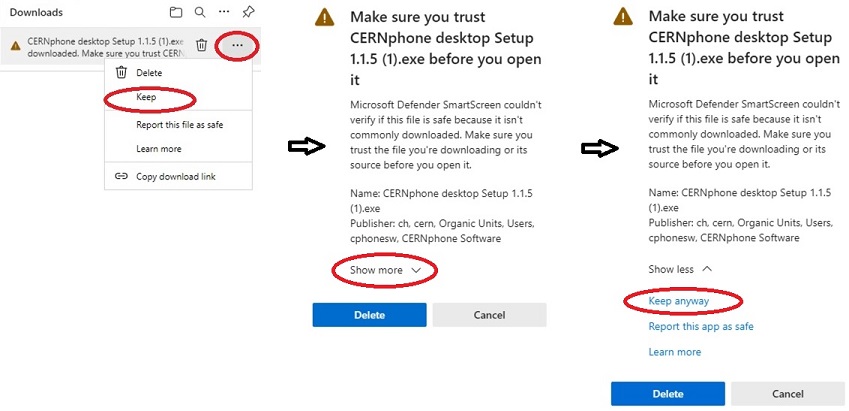
- Note: If you are downloading the app from Microsoft Edge, you will probably see a security warning saying :
CERNphone desktop Setup 1.2.x.exe isn't commonly downloaded. Make sure you trust CERNphone desktop Setup 1.2.x.exe before you open it.
To download the installer anyway, just click in the corresponding option in the three dots menu:
- After installation, please follow the CERNphone desktop and CERNphone User Portal guides, and also read the FAQ.
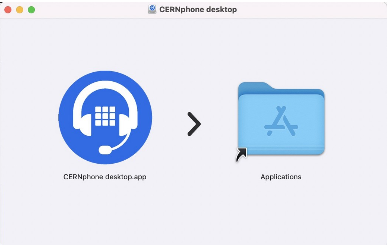
Mac
After downloading the DMG image, open it. Then drag the app file at the left of the window and drop it to the “Applications” folder at the right of the window. After that, you will see the app in the macOS Launchpad.
- You may be prompted for keychain access (as CERNphone stores authentication token information in the keychain). Please grant
Always Allowpermissions when requested for. - You may also be prompted to grant access to network and microphone access permissions.
- You may also be prompted to grant access to control systems events (for issuing notifications and application file system access).
- After installation, please follow the CERNphone desktop and CERNphone User Portal guides, and also read the FAQ.
Linux
CERNphone desktop is supported on recent CentOS (7 and 8) and Ubuntu versions. (It reportedly works on other distributions as well but may require additional configuration and/or installation of libraries.)
The app is distributed in the universal AppImage format (link). In order to execute it, you can just run it from the command line.
$ ./cern-phone-app.AppImage
You may need to add file exection permissions by running the following command: chmod +x cern-phone-app.AppImage
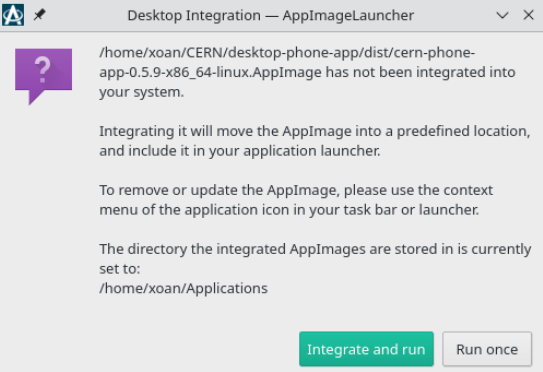
The AppImage can be used directly as a regular executable on many Linux distributions. You can also further integrate it in your system so that it looks like a regular app. Integrating the AppImage consists on moving the downloaded file to a more permanent directory and creating a *.desktop file in your home directory.
To integrate an AppImage the recommended way is using a tool like AppImageLauncher (which may or may not be pre-installed on your current distribution; to install it, please follow the instructions in their repository). This tool will integrate the app for you, so that you don't have to move the file or create the complementary files yourself.
-
Note: This application uses the system secure storage for saving tokens and other sensible information. Therefore, it is required to have a service which provides
org.freedesktop.secrets. In most Linux distributions this is pre-installed by default, so it’s not something to worry about if the application works fine for you. -
Note: If on your Linux distribution the AppImage binary fails with an error like
FATAL:setuid_sandbox_host.cc(158)] The SUID sandbox helper binary was found, but is not configured correctly.orGPU process isn't usable. Goodbye., you can run the app with --no-sandbox as an argument, e.g../cern-phone-app.AppImage --no-sandbox. -
Note: If the app fails with
dlopen(): error loading libfuse.so.2please install fuse, as it's required to run appimages. In Ubuntu or Debian you can runsudo apt install fuse, on CENTOSsudo dnf install fuse. -
After installation, please follow the CERNphone desktop and CERNphone User Portal guides, and also read the FAQ.
3. Installing CERNphone mobile
The installation instructions are different for Android and iOS.
Android
Please read carefully the installation instructions below, and make sure you follow all steps 1-6 up to the end including disabling data saver and battery saving settings, as incoming calls will not work otherwise!
- On your Android smartphone, go to the Google Play Store and install the application. (If you previously had CERNphone installed and need to redo the configuration, please deinstall the existing app first).
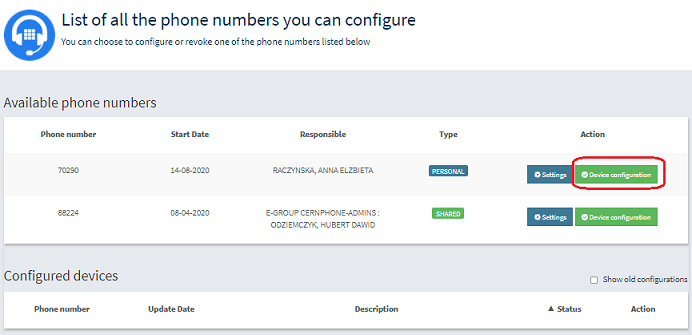
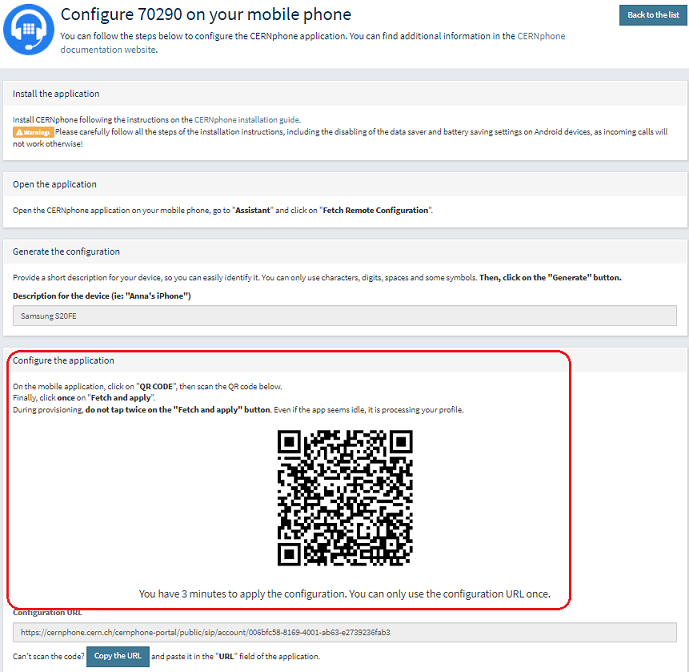
- Once the creation of a number on CERN resources portal for CERNphone is completed, you need to "provision" your app (which means to remotely configure the app with your specific configuration). This is done by flashing a QR code.
- For this, you need to open a web browser and follow the instructions under: CERNphone portal -> Device configuration
- We strongly recommend you open a web browser on a different device (a desktop / laptop or even a different mobile phone) as this allows you to configure your device by simply flashing a QR code. You can still configure the app even if you don’t have access to another device but you will have to copy and then enter a URL.
- During and after the provisioning, you may be requested to grant permission to the following:
- Taking pictures and record video
- Accessing your contacts
- Allow to record audio
- Make and manage phone calls
- Access Do Not Disturb settings
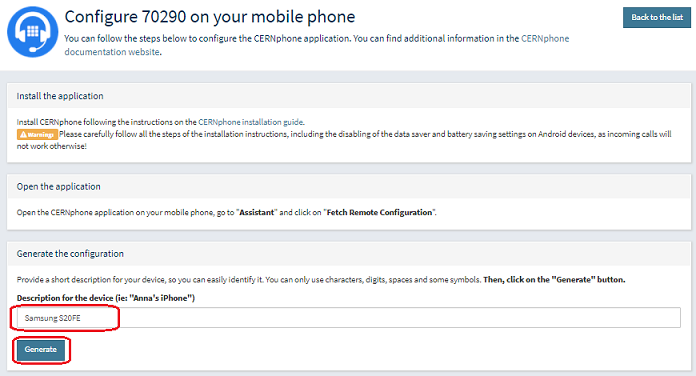
Generate configuration after providing a short description/name of your device:
On CERNphone mobile app, tap on the the horizontal bars to the upper left -> Assistant:
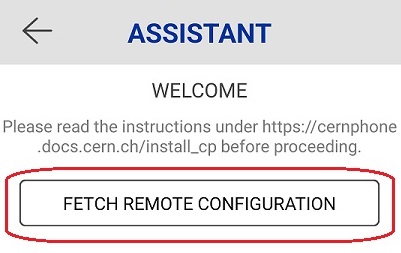 ->
-> 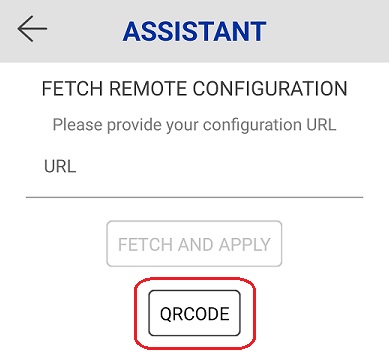
Scan the QR code generated on your desktop (or copy the URL of the application)
- Please restart the app. You can quit the app by tapping on the horizontal bars to the upper left, then chosing "Quit", then open the app again, or by swiping up the app. Then, open up the app again. Alternatively, you can also reboot your phone.
- Run the echo test call (by dialling
11111orecho). The app will request access to your microphone. -
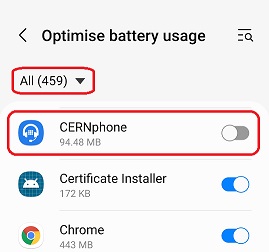
Please disable both mobile network "data saver" settings and battery saving settings for the CERNphone app. If you do not follow these instructions, you will likely miss incoming calls when your device is idle or locked:
- a) Disable battery saving: Go to your phone "Settings" > select "Applications" > scroll down to CERNphone > select "Battery" > Disable it from battery optimisation.
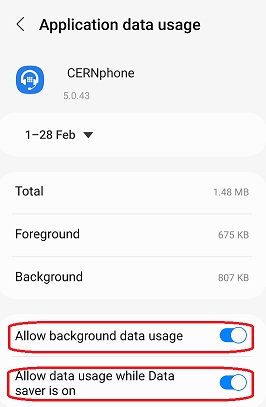
- b) Disable mobile data saving: Go to your phone "Settings" > select "Applications" > select "Mobile Data" > enable "Allow background data usage" and "unrestricted data usage".
Some Android variants may have slightly different menus. Please check FAQ #4 of the "receiving calls" section.
-
Make sure you read the user guides for the app and for the CERNphone User Portal, and the FAQ.
iPhone
The CERNphone iOS version is available on the App Store by following this link - CERN SSO authentication required. (Note: The app is distributed as an unlisted app and cannot be found by using the App Store search function).
Please follow the steps 1-7 to the end, as otherwise your app may not work correctly.`
-
On your iOS smartphone, open Safari* and open the above link, then install the application. (If you previously had CERNphone installed and need to redo the configuration, please deinstall the existing app first).
*Note that only Safari should be used, other web browsers may not work.
-
Start the CERNphone application.
-
Grant access to all requests from the application:
- Accessing the network
- Accessing your contacts
- Accessing the camera
- Sending notifications
-
Once the creation of a number on CERN resources portal for CERNphone is completed, you need to "provision" your app (which means to remotely configure the app with your specific configuration). This is done by flashing a QR code.
- For this, you need to open a web browser and follow the instructions under: CERNphone portal -> Device configuration
- We strongly recommend you open a web browser on a different device (a desktop / laptop or even a different mobile phone) as this allows you to configure your device by simply flashing a QR code. You can still configure the app even if you don’t have access to another device but you will have to copy and then enter a URL.
Generate configuration after providing a short description/name of your device:
On CERNphone mobile app, tap on the the horizontal bars to the upper left -> Assistant:
->
Scan the QR code generated on your desktop (or copy the URL of the application)
- Please restart the app. You can restart the app e.g. by swiping it up, or by rebooting the phone.
- Run the echo test call (by dialling
11111orecho). The app will request access to your microphone. - Make sure you read the mobile and CERNphone User portal guides and the FAQ.